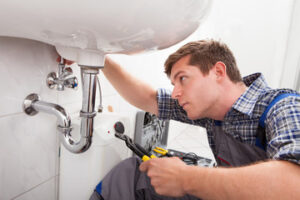
Topeka Plumber installs and repairs piping systems that carry water, waste, and gas in residential and commercial settings. They also work on plumbing fixtures and appliances like sinks, toilets, and bathtubs. Plumbers often use specialized tools and equipment to diagnose and fix issues with clogs, leaks, and damaged components.

Plumbers collaborate with other professionals, such as architects and construction teams, to ensure that plumbing is seamlessly integrated into building projects. They must also be knowledgeable about local codes and regulations.
The faucet handle controls the flow of water in a household sink. The handle can be turned in several cylindrical directions to control water temperature and pressure. The handle is attached to a cartridge valve that opens and closes when the handle is turned on or off. The valve is also equipped with a lever that can be moved from one position to another. In this way, different water temperatures can be set for various purposes, such as bathing and cooking.
Most faucets are designed with a single handle for hot and cold water. The handle is mounted on top of the spout or on either side of it if there are additional sink holes. Some older faucets may have two handles that control both the hot and cold water. A leaking faucet handle is often caused by mineral buildup, but it can also be due to incorrect installation or worn parts. The good news is that it’s relatively easy to repair a leaky faucet handle with the right tools and supplies.
First, turn off the water supply to the sink by closing the shut-off valves located under the sink. Afterwards, make sure that the drain is completely closed to prevent screws and other small parts from falling down the drain and getting lost forever.
Next, examine the faucet handle to determine what kind of cartridge it uses. You should be able to tell by looking at the back of the handle for a set screw or decorative cap (also called an escutcheon). If there’s a screw on the back of the handle, use a flat head screwdriver to remove it. Otherwise, look for a plastic button or disc that snaps out and exposes a screw. If there isn’t a screw, you may be able to unscrew the handle with your fingers.
After removing the handle, inspect it for damage or corrosion and clean it using vinegar or a suitable substitute. Soak the handle for several hours to loosen any deposits and allow it to dry before reinstalling it. Depending on the model of your faucet, you may need to install a new O-ring or seal. Before reinstalling the handle, it’s important that it sits perfectly straight on the cartridge valve. This can be done by lifting it up slightly and turning it in the correct direction.
Faucet Seat
The faucet seat sits inside the faucet, a watertight seal that keeps the cylinder from leaking when you turn off the water. But the washer that pushes the seat can get worn down and create a leak. To solve this problem, you need to polish the brass so it provides a more uniform and effective seal. This is a simple task, but you need to have the right tool. The best option is a valve seat dresser, which you can pick up at your local hardware store for about ten bucks.
This tool has a combination of square and hex heads that fit most faucet seats, and it works by rotating it on the seat to smooth out any imperfections. When used correctly, it can eliminate a drip in seconds. Just be careful not to overdo it — the soft brass can get damaged if you grind too much.
If you have a single-handle faucet that leaks at the spigot or handles, replacing the washer or faucet seat should fix the problem. Before making any repairs, make sure the water supply is turned off. First, loosen the handle set screw with a spanner wrench (hex end) or pliers and remove the handle. Next, unscrew the adjusting ring with a spanner wrench and turn it counterclockwise to remove the cap (square end). Apply penetrating oil to the threads before trying to remove the cap.
You can buy replacement washers and seats at any home improvement center. You can also find kits with both the springs and seats for a cheaper solution. Install the new washers and seats, following the manufacturer’s instructions. You will need to re-tighten the adjusting ring when you are done.
If you have a cartridge-type faucet, the valve seat is not replaceable, but you can still repair it. The key is to use a valve seat dresser to smooth out the surface so the washer can cling more securely to it when it closes. To do this, insert the tool as described above and twist back and forth until you can feel the brass is polished. This will make a more even and secure seal that should last longer than a fixed washer.
Faucet Cylinder
Cartridge faucets are commercial-grade types that control both temperature and flow. They’re popular in facilities that use a lot of water, because they prevent cross-flow and help avoid costly leaks. Like other parts of a faucet, they can break or wear out over time and need replacement. Replacing a cartridge requires shutting off the water supply (usually with valves under sink that turn clockwise to stop water flow). Then, you remove and replace the handle and assemble the cartridge, replacing any worn parts.
Start by placing a sink basket strainer in the drain to catch any falling parts. Next, put a towel down to protect your countertops and sink surface from water drips as you work. You may want to wear rubber gloves for this part of the job, as well. If your faucet has a decorative cap, pry off the screw with a small flathead screwdriver. Then, loosen the handle screw with a Phillips screwdriver and pull the handle off.
You’ll need to remove the spout nut and faucet retaining nut from the faucet body, which may require using a wrench. You’ll also need to remove the spout cap and set it aside. You’ll need to clean any mineral deposit buildup from these components as well, or your new cartridge will leak. If there’s a cartridge retainer clip, remove it with needle-nose pliers or slip-joint pliers. If the cartridge has a spanner cap, you’ll need to grip it with pliers and twist to remove it. Some kits contain special cartridge-pulling wrenches, which you can purchase at hardware stores and home centers.
If your faucet has a valve seat, you’ll need to inspect it for pitting or other damage. You’ll also need to replace the washer if there is one, as well as the o-ring if it’s worn out or cracked. Make sure to coat any new O-rings with plumber’s grease, as this helps ensure they won’t leak in the future.
Some cartridges have a U-shaped clip that needs to be removed before you can remove the cartridge. This clips around two plastic tabs on the cartridge body, so note its precise orientation when you remove it so that you can reinstall it the same way.
Faucet Supply Lines
Supply lines carry hot and cold water to sinks, tubs and showers. They are usually copper, but can be PVC, PEX or CPVC as well. They are normally hidden behind wall tiles or behind the cabinet under a sink. Occasionally, these supply lines can develop leaks. In such cases, plumbers remove the old supply line and install a new one. This is a plumbing repair that many homeowners feel comfortable undertaking themselves, but it is important to understand the basics of faucet supply lines so you can do the job correctly.
Faucet supply lines come in different sizes to accommodate various taps and the existing plumbing within a home or business. They also feature a variety of connection types and materials, such as FIP (female) hex nut connectors or compression valves. When installing a new supply line, it is important to choose the correct size for both the tap and the shut-off valve. Incorrect sizing can result in an improper connection that could cause leaks.
When replacing the supply line on a sink, it is best to remove any items that are stored under the sink so you can get to work without tripping over anything. Clear the workspace and put down a towel to catch any water that may drip during the process. Once the workspace is clear, turn off the water at the shut-off valve under the sink. Make sure you have a shut-off valve for both the hot and cold water lines.
If your old supply line has a corroded or damaged tailpiece, you will need to replace it. Some faucets come with factory-attached soft-copper tubes that are easy to attach. These are not as flexible as the braided supply tubes, however, so they may need to be shaped before connecting them to the faucet’s tailpiece.
Most faucets have a 1/2-inch connector, but you will need to match this size with the size of the existing connections on your building’s water pipes. If you are unsure of the size of the existing connector, you can contact your plumbing professional or refer to your faucet’s instruction manual for details. When connecting the new supply line to the faucet, use plumber’s tape around the threads. Wrap it at least five or six times to ensure a tight, leak-free connection. Once you connect the new supply line, hand-tighten it first and then use a wrench to give it a final snug fit.